


When you face a survival situation, your survival priorities can mean the difference between life and death. Shelter comes first because exposure is the top killer outdoors—hypothermia can take you in just hours. Water follows, since dehydration quickly breaks down your body and weakens your survival plan. Fire supports both shelter and water, letting you stay warm and purify water. Many people forget these basics, focus on food, or ignore first aid in an emergency. Build your survival preparedness now and plan for these priorities.
Key Takeaways
- Shelter, water, and fire are the top survival priorities because they protect your body and keep you alive longer than food.
- Always adapt your survival plan to your situation; sometimes first aid or signaling must come before shelter or water.
- Use reliable gear like tarps, water filters, and fire starters to build shelter, find safe water, and make fire easily.
- Pack multi-use tools and keep your survival kit light to stay mobile and ready for any emergency.
- Include first aid supplies and signaling devices in your kit to treat injuries and increase your chances of rescue.
Survival Priorities
When you find yourself in the wild or facing an unexpected emergency, knowing your survival priorities can save your life. You need a clear plan to guide your actions. The order you follow often depends on your environment, your condition, and the specific challenges you face. Let’s break down how you can decide what to do first and why.
The Rule of Threes
You might have heard of the survival rules of three. This simple guideline helps you remember how long you can last without certain essentials:
- You can survive about three minutes without air.
- You can survive about three hours without shelter in harsh weather.
- You can survive about three days without water.
- You can survive about three weeks without food.
This rule gives you a starting point for your survival plan. If you’re exposed to freezing cold or blazing heat, shelter becomes your top priority. Without it, your body loses or gains heat too quickly, and you risk hypothermia or heatstroke. Once you have shelter, you need to find water. Dehydration weakens you fast, making every task harder. Fire comes next. It keeps you warm, helps you purify water, and lets you cook food. Food is important, but you can last much longer without it than without the other essentials.
▶Tip: Always think about your environment. If you’re in the desert, water might jump to the top of your list. In the mountains during a snowstorm, shelter and fire become urgent.
Adapting Priorities
Survival priorities don’t always follow the same order. Sometimes, you need to act fast to address first aid or signaling before anything else. Imagine you’re injured in an earthquake. You must stop bleeding or help someone breathe before you even think about shelter or water. In some emergencies, signaling for help becomes your main focus. For example, if you’re trapped under debris, you should use a whistle or tap on pipes to alert rescuers. Lighting a fire or searching for water can wait until you know help is on the way.
Here are a few situations where you might need to change your plan:
- After a chemical spill or attack, you need to evacuate and signal for help right away. Staying put or searching for food could put you in more danger.
- If you’re caught in a building fire and can’t escape, you should shelter in place and signal rescuers by hanging a white cloth out the window.
- When your clothes catch fire, your only priority is to stop, drop, and roll to put out the flames.
- If you’re trapped after an earthquake, focus on first aid and signaling. Don’t waste energy shouting or lighting matches.
Your survival plan must stay flexible. You need to assess your situation and decide which priorities matter most at that moment. Sometimes, first aid or signaling comes before shelter, water, or fire. In other cases, you can follow the classic order. The key is to stay calm, think clearly, and adjust your actions to fit the emergency.
▶Remember: Your survival priorities are not set in stone. The best survivalists know how to adapt their plan to any situation.
Shelter

Why Shelter Matters
You might think food or water comes first, but shelter often decides your fate in the wild. Without protection, your body loses or gains heat fast. Hypothermia can set in within two hours if you get wet and cold. In hot weather, heatstroke can sneak up on you after days of exposure, especially if you cannot find shade or cool air. Older adults and young children face even higher risks. Shelter keeps you safe from wind, rain, snow, and sun. It gives you a place to rest and recover, which boosts your chances of survival.

Types of Shelter
You have many options for building a shelter, and the best choice depends on your environment. Survival experts say you should always adapt your shelter to your surroundings. Here are some common types:
- Lean-to: Quick to build, works well in forests. Use two trees and a ridge pole, then pile on branches and leaves for insulation.
- Tarp shelter: Super versatile. You can set it up as a burrito wrap, hammock cover, or simple A-frame. Great for rain or sun.
- Debris hut: Best for cold nights. Stack leaves, grass, and branches for warmth, but it takes effort.
- Snow cave or quinzee: Perfect for snowy places. Dig into a snow mound for insulation and wind protection.
- Tree platform: Keeps you off wet ground or away from animals. Needs skill and strong branches.
Pick a spot away from hazards like falling branches or flooding. Always check for wind direction and use natural materials for extra insulation.
Shelter Gear
The right gear makes building a shelter much easier. Survival instructors recommend these essentials:
- Tarp or basha: Lightweight, waterproof, and easy to set up in many ways.
- Bivvy bag: Compact, waterproof, and breathable. Great for emergencies.
- Sleeping bag: Keeps you warm and helps you rest.
- Cordage (like paracord): Ties everything together, literally.
- Emergency blanket: Reflects heat and adds a layer of protection.
▶Tip: Before you build, decide what you need your shelter to do. Will it keep you dry, warm, or hidden? Make sure it fits you and your gear, and always face the opening away from the wind.
Water

Finding Water
You can last only about three days without water, but that number drops fast in hot or cold climates. Dehydration sneaks up on you, making every survival task harder. Your body loses water through sweat, breath, and even in cold air. You need to spot water sources quickly. Look for flowing streams or small rivers first. These usually offer cleaner water than stagnant ponds. If you see animal tracks, insect swarms, or birds flying low at dusk, follow them—they often lead to water.
You can also collect rainwater in containers or use a tarp to funnel it. In dry areas, dig wells in damp sand behind dunes or in dry riverbeds. Wipe dew from plants at sunrise with a cloth. Try condensation tricks, like tying a clear plastic bag over leafy branches or building a solar still. Here’s a quick guide to some reliable methods:
|
Method |
Description |
Success Rate / Yield |
Key Notes |
|
Natural Condensation (Tree) |
Tie clear plastic bags over leafy branches to collect condensation. |
Best in morning; check every 2-3 hours. |
Needs temp change; collect water at bag corners. |
|
Rock Condensation |
Use angled plastic on rocks to channel condensation. |
Best in morning. |
Placement and angle matter. |
|
Solar Still Construction |
Dig a hole, add green plants, cover with plastic, collect water in a cup. |
1-2 liters/day in good sun. |
More stills = more water; can add non-potable water for more yield. |
|
Tree Root Water Extraction |
Cut and drain suitable roots. |
100-250 ml per meter of root. |
Filter with cloth for clarity. |
|
Dew Collection |
Wipe dew from plants at sunrise. |
Small, immediate amounts. |
Must act fast before dew evaporates. |
▶Tip: Avoid drinking seawater, urine, or alcohol. These will speed up dehydration and put your survival at risk.
Water Purification
Never drink untreated water in the wild. Even clear streams can carry bacteria, viruses, or parasites. Drinking unsafe water causes diseases like cholera, typhoid, hepatitis, and giardiasis. Each year, millions get sick or die from waterborne illnesses. Always purify water before you drink it.
You have several options:
- Boiling: Bring water to a rolling boil for at least one minute. This kills most pathogens.
- Filtration: Use a filter with a pore size of 0.1 to 0.2 microns. These remove bacteria and protozoa. Some advanced filters also block viruses.
- Chemical treatment: Chlorine dioxide tablets or drops kill bacteria, viruses, and protozoa. Wait times vary, usually up to four hours.
- UV light: UV pens zap most germs but need clear water to work well.
Each method has pros and cons. Boiling works everywhere but needs fire. Filters are fast and portable. Tablets weigh almost nothing but take time and may change the taste.
Water Gear
Survival experts recommend packing lightweight, reliable gear for water purification. Here’s a quick comparison:
|
Gear Item |
Weight (oz) |
Cost (USD) |
Filtration Type |
Effectiveness (Micron Rating) |
Notes on Use and Features |
|
Sawyer Mini |
~2 |
$46 |
Squeeze |
0.1 micron |
Ultra-light, portable, includes pouch and plunger. |
|
Lifestraw Peak Solo |
~2 |
$30 |
Straw |
0.2 micron |
Affordable, direct drinking. |
|
Katadyn BeFree |
2.3 |
N/A |
Flexible Bottle Filter |
0.1 micron |
Compressible, good flow rate. |
|
Platypus QuickDraw |
~3 |
N/A |
Collapsible Reservoir |
0.1 micron |
Lightweight, versatile. |
|
Survival Filter Pro |
12.8 |
$70 |
Pump + Carbon |
0.1 micron + carbon |
Durable, reduces chemicals. |

Chemical tablets like chlorine dioxide are a smart backup. They weigh almost nothing and work against most germs. Always carry a metal container for boiling water. With the right gear, you can turn almost any water source into safe hydration and boost your survival odds.
Fire in Survival
Why Fire is Essential
Fire does more than keep you warm. In a survival situation, you rely on fire for several critical tasks:
- You use fire to cook food, making it safer and easier to digest.
- Boiling water with fire purifies it, killing harmful bacteria and parasites.
- Fire gives you light and comfort at night, which helps you stay calm.
- You can use fire to signal for help by creating smoke or bright flames.
- Practicing fire-building in different weather conditions builds your confidence and skill.
Survival instructors recommend daily practice with fire. They also suggest having backup ways to start a fire and purify water. This habit prepares you for real emergencies.
Fire-Starting Methods
You have many ways to start a fire, but some work better than others in tough conditions. Ferrocerium rods, often called ferro rods, shine in wet or windy weather. They throw hot sparks even when damp. Matches work well if you keep them dry and waterproof. Lighters offer quick flames but can fail in the cold or after getting wet. Traditional methods like bow drills need skill and patience, especially when the weather turns bad.
To boost your chances, pick a dry, flat spot for your fire. Build a platform with dry wood and brace your kindling above the tinder. This setup keeps your fire breathing and prevents smothering. Shelter your fire from wind and rain, maybe under a tarp or natural cover. Practice with all your ignition sources before you need them.
▶Tip: Always carry at least two fire-starting tools. Practice using them in rain, wind, and cold so you know what works best for you.
Fire Gear
Choosing the right fire-starting gear makes a big difference. Here’s a quick look at some top picks:
|
Fire Starter |
Key Features |
Durability & Reliability |
Pros |
Cons |
|
Bayite 4" Ferro Rod |
Waterproof, 9ft paracord lanyard, 5,500°F sparks |
Long-lasting, easy to use |
Durable, reliable |
Slightly heavy |
|
Light My Fire Original Swedish Fire Starter |
All-weather, built-in whistle, ergonomic design |
Waterproof, versatile |
Comfortable, high quality |
Bulky for some |
|
SURVIVE Permanent Match |
Waterproof, refillable, compact |
15,000 strikes, needs refills |
Portable, unique |
Needs maintenance |
|
Exotac NanoStriker XL |
Waterproof, includes striker and tinder compartment |
Reliable in extreme conditions |
Durable, easy to use |
Bulkier than others |
Most fire failures happen because of wet tinder, poor fire management, or lack of dry materials. Always gather extra tinder and kindling before you strike your first spark. Build a contained fire pit or surround your fire with rocks to keep it safe. Training and practice help you avoid common mistakes and keep your fire going when it matters most.
Packing Gear
Prioritizing Essentials
When you build your survival kit, you want to focus on what matters most. Experts recommend the 5 C's of survival as your starting point. These five items cover your basic needs and help you create a solid plan for any situation:
- Cutting Tool – A reliable knife helps you cut wood, prepare food, and even start a fire.
- Combustion Device – Always pack more than one way to make fire, like a lighter and a ferro rod.
- Cover – Shelter and protective clothing keep you safe from the elements.
- Container – A metal cup or bottle lets you boil water and cook food.
- Cordage – Strong rope or paracord helps you build shelter, set traps, and fix gear.
You should always check your essential carry lists before heading out. These lists help you stick to the basics and avoid packing too much. If you keep these five items close, you can handle most emergencies and adjust your plan as needed.
Multi-Use Items
Smart packing means choosing gear that does more than one job. Multi-use items save space and lighten your load. Take a look at some favorites among experienced survivalists:
|
Item Name |
Key Features |
Practical Benefits |
|
SOG Professional Multi-Tool |
Pliers, wire cutters, knives, screwdrivers |
Handles repairs, camp setup, and fire prep without extra tools |
|
Leatherman One-Hand Tool |
16 tools, compact, one-handed use |
Saves space, quick access for emergencies and daily tasks |
|
FireKnife Survival Knife |
Blade plus built-in firesteel |
Cuts and starts fires, even when wet |
|
Antarctica Emergency Survival Kit |
60 tools in one kit |
Covers shelter, fire, and first aid in a compact package |
|
Ultimate Outdoor Survival Kit |
125 pieces, organized case |
Supports navigation, shelter, and emergency needs in one spot |
You can see how these items help you stick to your plan and keep your survival gear simple. The more you practice your survival skills, the better you get at spotting gear that works double duty.
Balancing Weight
You want your pack to be light enough to carry all day but still have everything you need. Studies and military guidelines suggest a maximum weight of about 50 pounds, or one-third of your body weight. Carrying more slows you down and drains your energy. Check out this chart for a quick look at recommended pack weights over time:

Experienced survivalists keep their packs light by focusing on must-have items and leaving out luxury gear. They use skills and experience to replace heavy tools with lighter options. You can organize your pack by putting heavy items close to your back and using compression bags. Always review your plan and adjust your gear for the environment. The right balance means you stay mobile and ready for anything.
▶Tip: Keep refining your kit. Every trip teaches you something new about what you really need.
First Aid and Signaling
First Aid Basics
When you face a real survival emergency, injuries can happen fast. You might slip on a trail, get bitten by an insect, or suffer from the cold or heat. Knowing how to handle these problems can save your life or help someone else. You need to act quickly to stop bleeding, treat burns, or manage a broken bone. Even small wounds can turn serious if you ignore them in the wild.
Here’s a quick table to help you remember the most common life-threatening injuries and what to do:
|
Injury Type |
Description / Symptoms |
Effective First Aid Techniques |
|
Severe Bleeding |
Bright red, spurting blood or steady dark flow |
Apply direct pressure, use a tourniquet if needed, keep wound clean, watch for shock |
|
Fractures & Sprains |
Pain, swelling, trouble moving limb |
Immobilize with splints, use clothing or sticks, rest, ice, compress, elevate |
|
Hypothermia & Frostbite |
Shivering, confusion, numb fingers or toes |
Move to warmth, remove wet clothes, wrap up, warm slowly |
|
Heat Exhaustion & Sunburn |
Heavy sweating, weakness, red skin |
Move to shade, drink water, rest, cool skin, use soothing creams |
|
Dehydration |
Dizziness, dry mouth, tiredness |
Drink water often, use small sips, add electrolytes if possible |
|
Animal & Snake Bites |
Swelling, pain, possible puncture marks |
Clean wound, keep limb still, seek help, do not try to catch the animal |
|
Allergic Reactions |
Swelling, itching, trouble breathing |
Remove stinger, use antihistamines, use epinephrine pen for severe cases |
|
Burns |
Red, blistered, or charred skin |
Cool with water, cover with clean bandage, seek help for severe burns |
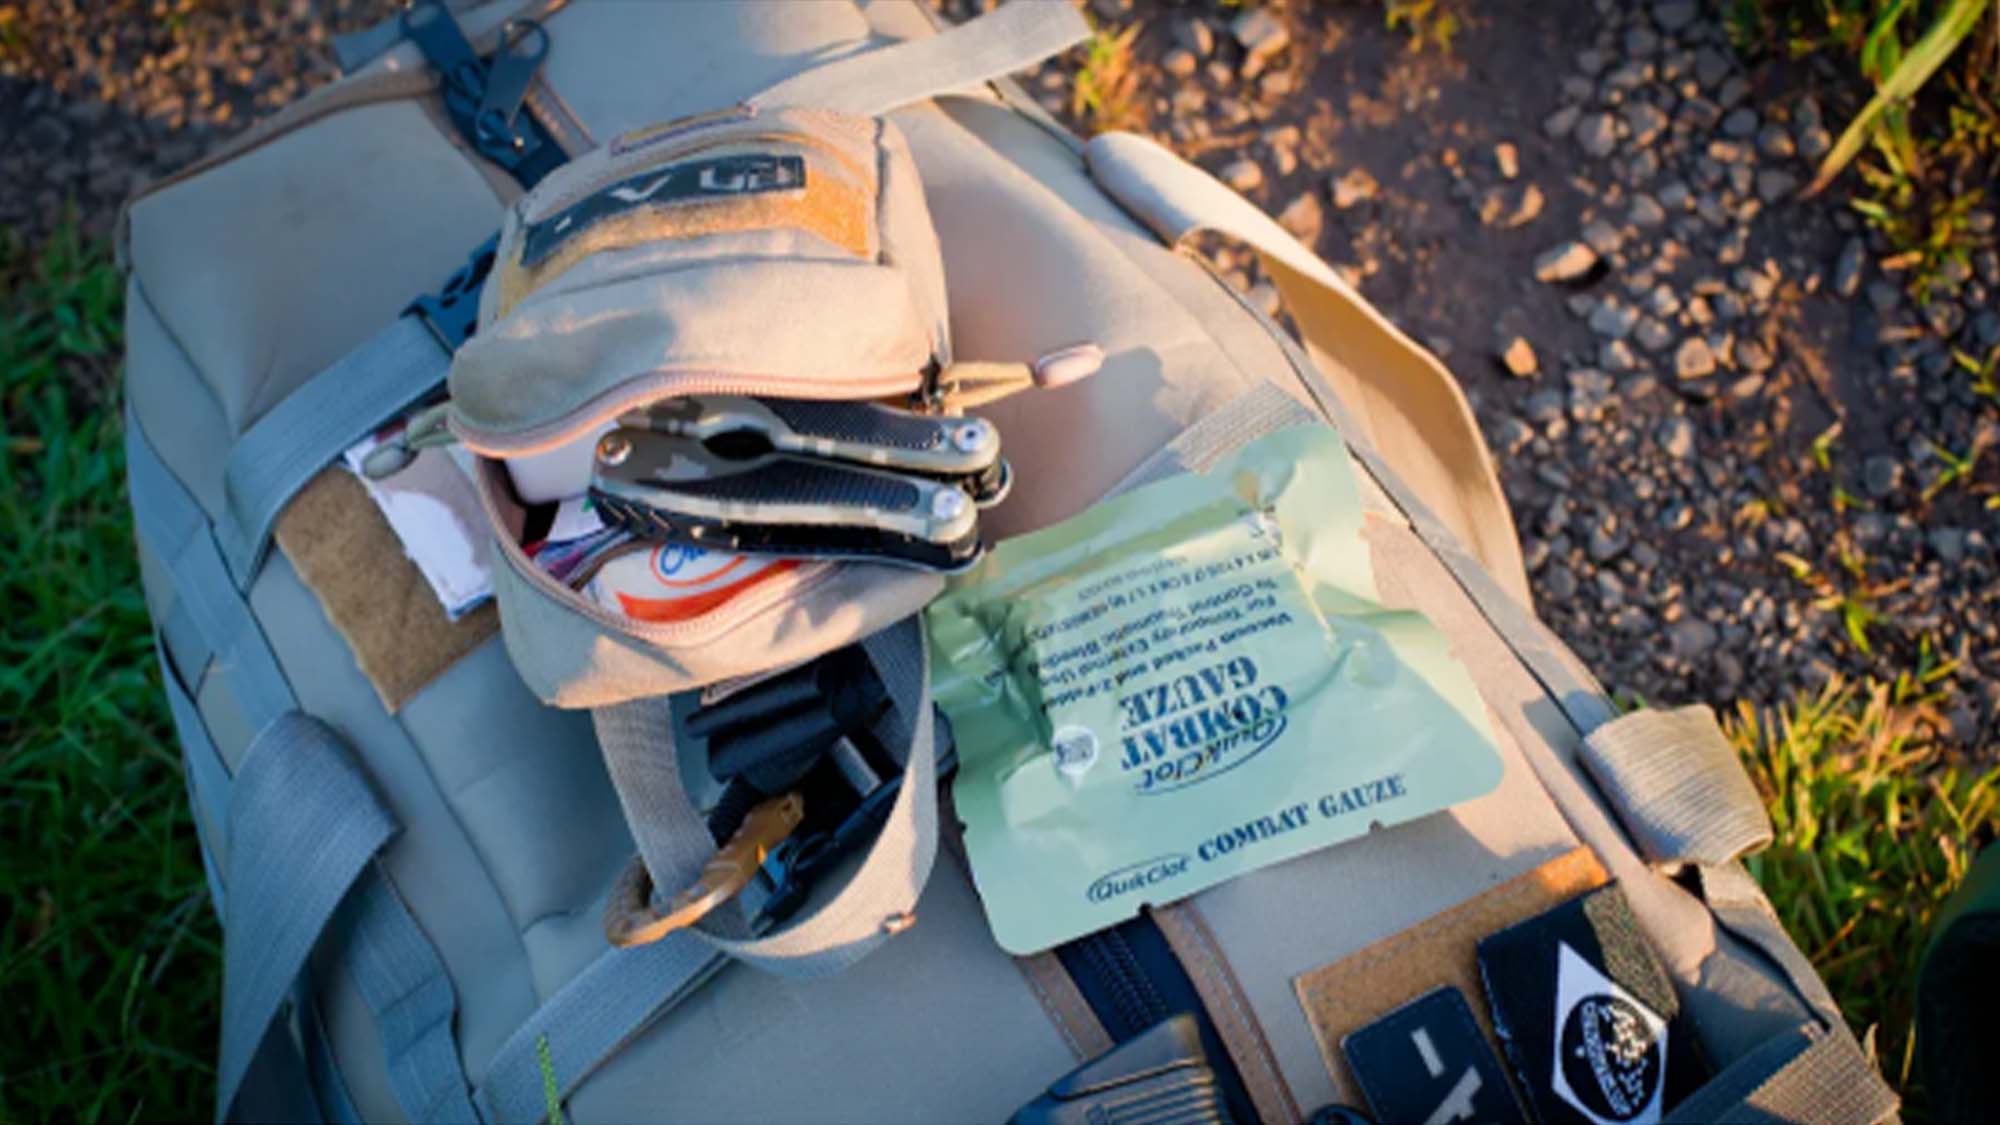
You should always pack a basic first aid kit. The American Red Cross recommends items like bandages, gauze, antibiotic ointment, gloves, and an emergency blanket. These supplies help you treat wounds, burns, and bites until you can get more help.
Signaling Tools
Getting rescued is a top goal in any survival situation. You want to make yourself as easy to find as possible. Signaling tools help you reach out for help, even if you are far from roads or towns. Some tools use light, others use sound, and some use technology.
Here are the most effective signaling tools to include in your kit:
- Signal mirror (reflects sunlight, visible for miles)
- Whistle (three short blasts mean distress; can be heard up to a mile away)
- Brightly colored cloth or flag
- Flares or smoke signals (great for attracting aircraft or search teams)
- Flashlight or headlamp (for night signaling)
- Cell phone or satellite messenger (if you have a signal)
- Personal Locator Beacon (PLB) or GPS messenger (these have helped save thousands since the 1980s)
▶Tip: Carry both traditional and modern signaling devices. Using more than one type can triple your odds of being found alive. Keep your signaling tools easy to reach in your pack.
A good survival kit always includes both first aid and signaling gear. These tools give you the best chance to handle injuries and get rescued quickly.
You now know the essentials: shelter, water, fire, first aid, and signaling. Keep your kit updated—check it every six months and replace anything expired. Practice your skills often, from fire-making to navigation. Regular training builds confidence and keeps your gear ready. Remember, a positive mindset and mental focus can make all the difference. Take action today so you stay prepared for whatever comes your way.
Share:
How to Choose the Right Survival Gear for Hiking, Camping, and Emergencies
Are doomsday bunkers actually safe?